Now that you know how to capture a picture with your ESP32 camera, you may want to store those pictures to a permanent medium.
The ESP32 camera ships with an internal storage (up to 16MB on some boards) that you can in part fill with files. Most of the times, though, you will insert an external SD card for both larger storage space and easier accessibility.
This page will show you how to easily interact with the SD card of your ESP32 camera to save images on it in 3 different ways:
- manually setting the filename
- using an always incrementing counter that survives reboots
- using NTP (Network Time Protocol) to use the current timestamp as filename
As an added bonus, when using the NTP timestamping, I will show you how easy it is to create a nested folder structure to save pictures under the current date folder (e.g. /20231001/20231001T100000.jpg, /20231001/20231001T110000.jpg, ...) to keep your files organized.
Hardware requirements
This project works with S3 and non-S3 boards.
If you don't have a board with SD card slot, you can still run the below sketches by replacing each occurrence of sdmmc with spiffs.
#include <eloquent_esp32cam/extra/esp32/fs/sdmmc.h>
// becomes
#include <eloquent_esp32cam/extra/esp32/fs/spiffs.h>

if (sdmmc.save(camera.frame).to(filename).isOk()) {}
// becomes
if (spiffs.save(camera.frame).to(filename).isOk()) {}Software requirements
This project is tested on EloquentEsp32Cam version 2.0.5
Arduino IDE Tools configuration for ESP32S3
!!! Install ESP32 core version 2.x, version 3.x won't work !!!
| Board | ESP32S3 Dev Module |
| Upload Speed | 921600 |
| USB Mode | Hardware CDC and JTAG |
| USB CDC On Boot | Disabled |
| USB Firmware MSC On Boot | Disabled |
| USB DFU On Boot | Disabled |
| Upload Mode | UART0 / Hardware CDC |
| CPU Frequency | 240MHz (WiFi) |
| Flash Mode | QIO 80MHz |
| Flash Size | 4MB (32Mb) |
| Partition Scheme | Huge APP (3MB No OTA/1MB SPIFFS) |
| Core Debug Level | Info |
| PSRAM | OPI PSRAM |
| Arduino Runs On | Core 1 |
| Events Run On | Core 1 |
| Erase All Flash Before Sketch Upload | Disabled |
| JTAG Adapter | Disabled |
Save frame with manual filename
If you're manually interacting with the ESP32 camera or you want to use your own naming scheme, you can easily choose the name of your file with the following code.
Filename: Manual_Name.ino
/**
* SDMMC file storage: manual filename
*
* This sketch shows how to save a picture on the SD Card
* filesystem by specifying the filename manually
*
* Open the Serial Monitor and enter 'capture' (without quotes)
* to capture a new image and save it to SD
*
* BE SURE TO SET "TOOLS > CORE DEBUG LEVEL = INFO"
* to turn on debug messages
*/
#include <eloquent_esp32cam.h>
#include <eloquent_esp32cam/extra/esp32/fs/sdmmc.h>
using namespace eloq;
void setup() {
delay(3000);
Serial.begin(115200);
Serial.println("___SAVE PIC TO SD CARD___");
// camera settings
// replace with your own model!
camera.pinout.freenove_s3();
camera.brownout.disable();
camera.resolution.vga();
camera.quality.high();
// you can configure each pin of SDMMC (if needed)
// (delete these lines if you are not sure)
sdmmc.pinout.clk(39);
sdmmc.pinout.cmd(38);
sdmmc.pinout.d0(40);
// or shorter
sdmmc.pinout.freenove_s3();
// init camera
while (!camera.begin().isOk())
Serial.println(camera.exception.toString());
// init SD
while (!sdmmc.begin().isOk())
Serial.println(sdmmc.exception.toString());
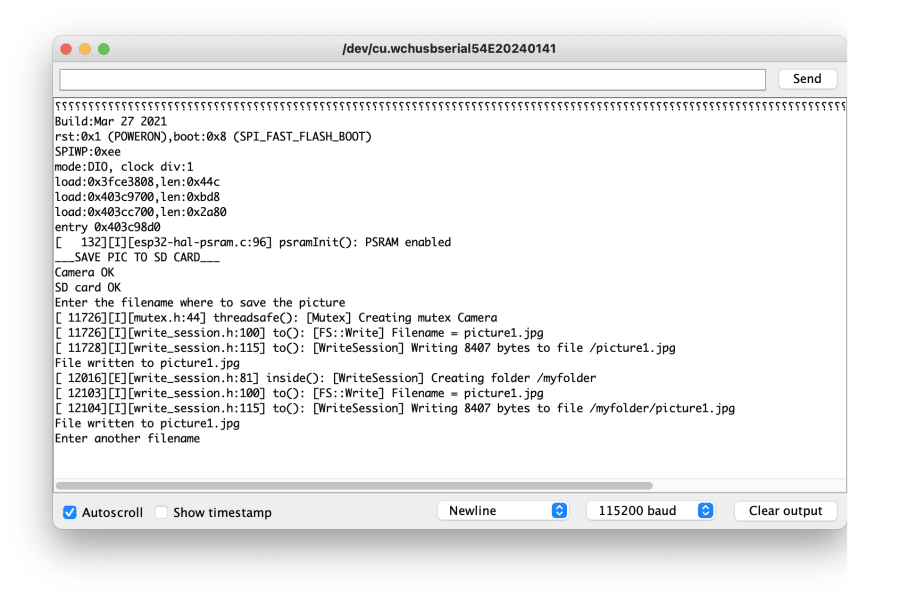
Serial.println("Camera OK");
Serial.println("SD card OK");
Serial.println("Enter the filename where to save the picture");
}
void loop() {
// await for filename from the Serial Monitor
if (!Serial.available())
return;
String filename = Serial.readStringUntil('\n');
filename.trim();
if (!filename.endsWith(".jpg") && !filename.endsWith(".jpeg"))
filename = filename + ".jpg";
// capture picture
if (!camera.capture().isOk()) {
Serial.println(camera.exception.toString());
return;
}
// save to SD
if (sdmmc.save(camera.frame).to(filename).isOk()) {
Serial.print("File written to ");
Serial.println(sdmmc.session.lastFilename);
}
else Serial.println(sdmmc.session.exception.toString());
// you can also save under a nested folder
if (sdmmc.save(camera.frame).inside("myfolder").to(filename).isOk()) {
Serial.print("File written to ");
Serial.println(sdmmc.session.lastFilename);
}
else Serial.println(sdmmc.session.exception.toString());
// restart the loop
Serial.println("Enter another filename");
}The code may seem lengthy, but it is for the most part comments and configuration lines.
Here is the breakdown.
Configure SD MMC
The EloquentEsp32Cam has a driver for the SD MMC library. I chose this library because it requires no configuration in most of the cases, it just works out of the box.
In the cases where it does not (eg. Freenove S3 camera), you can configure the pins with the following lines.
// replace with your board actual pins
sdmmc.pinout.clk(39);
sdmmc.pinout.cmd(38);
sdmmc.pinout.d0(40);
// or shorter
sdmmc.pinout.freenove_s3();When using the AiThinker camera, for example, you can just delete these lines.
Save frame under root directory
After you input your desired filename in the Serial monitor, this is the line that saves the current frame under the root directory of the SD card.
if (sdmmc.save(camera.frame).to(filename).isOk()) {}Save frame under nested directory
If you want to keep your files organized under a tree structure, you can nest a file under your desired folder by adding inside(folder-name).
if (sdmmc.save(camera.frame).inside("myfolder").to(filename).isOk()) {}Here is the Serial Monitor log for this sketch.
Save frame with incremental filename
Many times you will use the ESP32 camera in a autonomous deployment (e.g. a timelapse setup). In this case you may not want to bother with manually choosing a filename for each frame. An incremental filename may be all you need.
By incremental naming I mean that your pictures will be saved as 0000001.jpg, 0000002.jpg and so on.
Getting this result is as easy as re-using most of the above sketch and replacing
if (sdmmc.save(camera.frame).to(filename).isOk()) {}with
if (sdmmc.save(camera.frame).to("", "jpg").isOk()) {}In the first case, the to function accepted the complete name of the file to write.
In the second case, it accepts a file name and file extension. If the filename is empty, it will fill it with the incremental counter. The best part is that the counter survives reboots, so you will never risk to overwrite existing images.
As before, you can nest this file under a specific folder.
if (sdmmc.save(camera.frame).inside("myfolder").to("", "jpg").isOk()) {}This same approach works with any kind of file, really, not just images.
// save text to .txt file with incremental name
if (sdmmc.save("Hello world!").to("", "txt").isOk()) {}Here is the Serial Monitor.

Filename: Incremental_Name.ino
/**
 * SDMMC file storage: incremental filename
 *
 * This sketch shows how to save a picture on the SD Card
 * filesystem by using an incremental filename that
 * persists across reboots
 *
 * Open the Serial Monitor and enter 'capture' (without quotes)
 * to capture a new image and save it to SD
 *
 * BE SURE TO SET "TOOLS > CORE DEBUG LEVEL = INFO"
 * to turn on debug messages
 */

#include <eloquent_esp32cam.h>
#include <eloquent_esp32cam/extra/esp32/fs/sdmmc.h>

using namespace eloq;


void setup() {
    delay(3000);
    Serial.begin(115200);
    Serial.println("___SAVE PIC TO SD CARD___");

    // camera settings
    // replace with your own model!
    camera.pinout.freenove_s3();
    camera.brownout.disable();
    camera.resolution.vga();
    camera.quality.high();

    // you can configure each pin of SDMMC (if needed)
    // (delete these lines if you're not sure)
    sdmmc.pinout.clk(39);
    sdmmc.pinout.cmd(38);
    sdmmc.pinout.d0(40);

    // init camera
    while (!camera.begin().isOk())
        Serial.println(camera.exception.toString());

    // init SD
    while (!sdmmc.begin().isOk())
        Serial.println(sdmmc.exception.toString());

    Serial.println("Camera OK");
    Serial.println("SD card OK");
    Serial.println("Enter 'capture' to capture a new picture");
}


void loop() {
    // await for "capture" from the Serial Monitor
    if (!Serial.available())
        return;

    if (Serial.readStringUntil('\n') != "capture") {
        Serial.println("I only understand 'capture'");
        return;
    }

    // capture picture
    if (!camera.capture().isOk()) {
        Serial.println(camera.exception.toString());
        return;
    }

    // save under root folder
    if (sdmmc.save(camera.frame).to("", "jpg").isOk()) {
      Serial.print("File written to ");
      Serial.println(sdmmc.session.lastFilename);
    }
    else Serial.println(sdmmc.session.exception.toString());

    // save under nested folder
    if (sdmmc.save(camera.frame).inside("myfolder").to("", "jpg").isOk()) {
      Serial.print("File written to ");
      Serial.println(sdmmc.session.lastFilename);
    }
    else Serial.println(sdmmc.session.exception.toString());

    // restart the loop
    Serial.println("Enter 'capture' to capture a new picture");
}Save frame with NTP timestamping
In the most demanding scenarios, you may want to keep track of when the picture was taken.
If you have access to WiFi, you can leverage NTP (Network Time Protocol) to keep track of time and name your files based on current date and time. This requires a bit of configuration before you can use it. The full sketch is listed below.
Filename: NTP_Name.ino
/**
 * SDMMC file storage: NTP filename
 *
 * This sketch shows how to save a picture on the SD Card
 * filesystem by generating a filename using current time
 *
 * Open the Serial Monitor and enter 'capture' (without quotes)
 * to capture a new image and save it to SD
 *
 * BE SURE TO SET "TOOLS > CORE DEBUG LEVEL = INFO"
 * to turn on debug messages
 */

// if you define WIFI_SSID and WIFI_PASS before importing the library
// you can call wifi.connect() instead of wifi.connect(ssid, password)
#define WIFI_SSID "SSID"
#define WIFI_PASS "PASSWORD"

#include <eloquent_esp32cam.h>
#include <eloquent_esp32cam/extra/esp32/ntp.h>
#include <eloquent_esp32cam/extra/esp32/fs/sdmmc.h>

using namespace eloq;


void setup() {
    delay(3000);
    Serial.begin(115200);
    Serial.println("___SAVE PIC TO SD CARD___");

    // camera settings
    // replace with your own model!
    camera.pinout.freenove_s3();
    camera.brownout.disable();
    camera.resolution.vga();
    camera.quality.high();

    // if connected to the internet, try to get time from NTP
    // you can set your timezone offset from Greenwich
    ntp.offsetFromGreenwhich(0);
    // or any of
    ntp.cst();
    ntp.ist();
    ntp.eest();
    ntp.cest();
    ntp.bst();
    ntp.west();
    ntp.cet();
    ntp.gmt();
    ntp.edt();
    ntp.pdt();

    // enable/disable daylight saving
    ntp.isntDaylight();
    ntp.isDaylight();

    ntp.server("pool.ntp.org");

    // you can configure each pin of SDMMC (if needed)
    // (delete these lines if not sure)
    sdmmc.pinout.clk(39);
    sdmmc.pinout.cmd(38);
    sdmmc.pinout.d0(40);

    // init camera
    while (!camera.begin().isOk())
        Serial.println(camera.exception.toString());

    // init SD
    while (!sdmmc.begin().isOk())
        Serial.println(sdmmc.exception.toString());

    // connect to WiFi to sync NTP
    while (!wifi.connect().isOk())
      Serial.println(wifi.exception.toString());

    // get NTP time
    while (!ntp.begin().isOk())
      Serial.println(ntp.exception.toString());

    Serial.println("Camera OK");
    Serial.println("SD card OK");
    Serial.println("NTP OK");
    Serial.print("Current time is ");
    Serial.println(ntp.datetime());
    Serial.println("Enter 'capture' to capture a new picture");
}


void loop() {
    // await for "capture" from the Serial Monitor
    if (!Serial.available())
        return;

    if (Serial.readStringUntil('\n') != "capture") {
        Serial.println("I only understand 'capture'");
        return;
    }

    // capture picture
    if (!camera.capture().isOk()) {
        Serial.println(camera.exception.toString());
        return;
    }

    // save under root directory
    if (sdmmc.save(camera.frame).to(ntp.datetime(), "jpg").isOk()) {
      Serial.print("File written to ");
      Serial.println(sdmmc.session.lastFilename);
    }
    else Serial.println(sdmmc.session.exception.toString());

    // save under nested directory
    String date = ntp.date();
    String datetime = ntp.datetime();

    if (sdmmc.save(camera.frame).inside(date).to(datetime, "jpg").isOk()) {
      Serial.print("File written to ");
      Serial.println(sdmmc.session.lastFilename);
    }
    else Serial.println(sdmmc.session.exception.toString());

    // restart the loop
    Serial.println("Enter 'capture' to capture a new picture");
}In this case, we added a new section to configure the NTP server.
// if connected to the internet, try to get time from NTP
// you can set your timezone offset from Greenwich
ntp.offsetFromGreenwhich(0);
// or any of
ntp.cst();
ntp.ist();
ntp.eest();
...

// enable/disable daylight saving
ntp.isntDaylight();
ntp.isDaylight();

ntp.server("pool.ntp.org");NTP needs to know where you're located to give the correct time. This is achieved by setting your offset from the Greenwich time (in hours). A few helper methods are provided for easier setup.
Then you need to configure if you're under daylight saving time or not.
The line
ntp.server("pool.ntp.org");lets you configure a specific NTP server. If you don't have any specific reason to change it, you can delete this line since pool.ntp.org is the default server.
Timestamped filename
To use the current timestamp as filename, it is as easy as
if (sdmmc.save(camera.frame).to(ntp.datetime(), "jpg").isOk()) {}If you remember from above, to accepts a filename and an extension. In this case we're using the current datetime as filename and jpg as extension. The filename will look something like 20231003T102005.jpg, where 20231003 is the date in YYYYMMDD format, T is the time separator, and 102005 is the time in HHMMSS format.
If you prefer to categorize the images under a folder structure that tracks the date, it couldn't be easier.
if (sdmmc.save(camera.frame).inside(ntp.date()).to(ntp.datetime(), "jpg").isOk()) {}
// or, if you want to name the file with the time only
if (sdmmc.save(camera.frame).inside(ntp.date()).to(ntp.time(), "jpg").isOk()) {}

This will generate a folder structure like below:
|- 20231001
   |- 20231001T100000.jpg
   |- 20231001T110000.jpg
   |- 20231001T120000.jpg
|- 20231002
   |- 20231002T100000.jpg
   |- 20231002T110000.jpg
   |- 20231002T120000.jpg
...It feels like magic, doesn't it?

Conclusion
In this page you learned 3 ways to save the current frame of your ESP32 camera to an external SD card:
- manually setting the filename
- using an always incrementing counter that survives reboots
- using NTP (Network Time Protocol) to use the current timestamp as filename
After configuring the SD and (optionally) the NTP server, it only takes 1 line of code to actually save the frame.
This gives you complete freedom over file naming scheme and folder structuring. One thing less to worry about in your next project!