Object detection is the task of detecting an object of interest inside an image. Until a couple years ago, this task was exclusive matter of computers due to the complexity of models and the prohibitive number of math operations to perform.
Thanks to platforms like Edge Impulse, however, the entry barrier for beginners has become much lower and it is now possible to:
- easily train an object detection model in the cloud
- (not so easily) deploy this model to the Esp32 camera
Sadly, the Esp32 camera seems not to be a first-class citizen on the Edge Impulse platform and the (few) documentation and tutorials available online miss a lot of fundamental pieces.
The purpose of this post is to help you develop and deploy your very own object detection model to your Esp32 camera with detailed, easy to follow steps, even if you're a beginner with Edge Impulse or Arduino programming.
Let's start!
Hardware requirements
This project works with S3 and non-S3 boards. An S3 board is highly recommended though.
Software requirements
ESP32 Arduino core version 2.x. Not 1.x. Not 3.x.
EloquentEsp32Cam >= 2.2
You will need a free account on Edge Impulse.
If you've never used Edge Impulse, I suggest you watch a couple video tutorials online before we start, otherwise you may get lost later on (there exists an official tutorial playlist on YouTube).
Arduino IDE Tools configuration for ESP32S3
!!! Install ESP32 core version 2.x, version 3.x won't work !!!
| Board | ESP32S3 Dev Module |
| Upload Speed | 921600 |
| USB Mode | Hardware CDC and JTAG |
| USB CDC On Boot | Disabled |
| USB Firmware MSC On Boot | Disabled |
| USB DFU On Boot | Disabled |
| Upload Mode | UART0 / Hardware CDC |
| CPU Frequency | 240MHz (WiFi) |
| Flash Mode | QIO 80MHz |
| Flash Size | 4MB (32Mb) |
| Partition Scheme | Huge APP (3MB No OTA/1MB SPIFFS) |
| Core Debug Level | Info |
| PSRAM | OPI PSRAM |
| Arduino Runs On | Core 1 |
| Events Run On | Core 1 |
| Erase All Flash Before Sketch Upload | Disabled |
| JTAG Adapter | Disabled |
Let's start with the end result.

Object Detection using ESP32(S3) Camera Quickstart
To perform object detection on our ESP32 camera board, we will follow these steps:
- Collect images from the camera
- Use Edge Impulse to label the images
- Use Edge Impulse to train the model
- Use Edge Impulse to export the model into an Arduino library
- Use
EloquentEsp32Camto run the model
Before this post existed, steps 1. and 5. were not as easy as they should've been.
I invite you to stop reading this post for a minute and go search on Google Esp32-cam object detection: read the first 4-5 tutorials on the list and tell me if you're able to deploy such a project.
I was not.
And I bet you neither.
Enough words, it's time to start tinkering.
CAUTION: there are 8 steps to follow from start to finish in this tutorial. Some of them only take 1 minute to execute, so don't get scared. But remember that it is crucial for you to follow them one by one, in the exact order they're written!
Collect images from the ESP32 camera
This is the first part where things are weird in the other tutorials. Many of them suggest that you use images from Google/internet to train your model. Some others suggests to collect data using your smartphone. How using random images from the web or from a 40 MP camera can help train a good model that will run on a 2$ camera hardware is out of my knowledge.
That said, I believe that to get good results, we need to collect images directly from our own Esp32 camera board.
This used to be hard.
But now, thanks to the tools I created for you, you will complete this task in a matter of minutes.
[1/8] Upload the "Collect_Images_for_EdgeImpulse" Sketch to your Board
After you installed the EloquentEsp32Cam library, navigate to File > Examples > EloquentEsp32Cam > Collect_Images_for_EdgeImpulse and upload the sketch to your board.

Filename: Collect_Images_for_EdgeImpulse.ino
/**
 * Collect images for Edge Impulse image
 * classification / object detection
 *
 * BE SURE TO SET "TOOLS > CORE DEBUG LEVEL = INFO"
 * to turn on debug messages
 */

// if you define WIFI_SSID and WIFI_PASS before importing the library,
// you can call connect() instead of connect(ssid, pass)
//
// If you set HOSTNAME and your router supports mDNS, you can access
// the camera at http://{HOSTNAME}.local

#define WIFI_SSID "SSID"
#define WIFI_PASS "PASSWORD"
#define HOSTNAME "esp32cam"


#include <eloquent_esp32cam.h>
#include <eloquent_esp32cam/extra/esp32/wifi/sta.h>
#include <eloquent_esp32cam/viz/image_collection.h>

using eloq::camera;
using eloq::wifi;
using eloq::viz::collectionServer;


void setup() {
    delay(3000);
    Serial.begin(115200);
    Serial.println("___IMAGE COLLECTION SERVER___");

    // camera settings
    // replace with your own model!
    camera.pinout.wroom_s3();
    camera.brownout.disable();
    // Edge Impulse models work on square images
    // face resolution is 240x240
    camera.resolution.face();
    camera.quality.high();

    // init camera
    while (!camera.begin().isOk())
        Serial.println(camera.exception.toString());

    // connect to WiFi
    while (!wifi.connect().isOk())
      Serial.println(wifi.exception.toString());

    // init face detection http server
    while (!collectionServer.begin().isOk())
        Serial.println(collectionServer.exception.toString());

    Serial.println("Camera OK");
    Serial.println("WiFi OK");
    Serial.println("Image Collection Server OK");
    Serial.println(collectionServer.address());
}


void loop() {
    // server runs in a separate thread, no need to do anything here
}Don't forget to replace SSID and PASSWORD with your WiFi credentials!
Don't forget to replace your own camera model, if different from Ai Thinker.
Once the upload is done, open the Serial Monitor and take note of the IP address of the camera.
Open a browser and navigate either to http://esp32cam.local or the IP address of the camera.
[2/8] Prepare your environment
The OV2640 sensor that comes with your ESP32 camera is pretty good for its price, really. Nevertheless, it still remains a 1 $ 2MP camera, so you can't expect great results in every scenario.
Do a favor to yourself and put some efforts into creating a proper shooting environment:
- use proper illumination (either bright sun or artificial light)
- de-clutter your environment (use a desk and a flat, monochrome background - e.g. a wall)
[3/8] Collect images in a web browser
Back to the webpage at http://esp32cam.local.
To collect the images, you simply need to click Start collecting. To stop, click Stop.
Please follow these EXACT steps to collect a good quality dataset (that guarantees you won't have troubles later on):
- put nothing in front of the camera. Collect 15-20 images. Pause, download and clear
- put the first object in front of the camera. Collect 20-30 images while moving the camera a bit around. Try to capture different angles and positions of the object. Pause, download and clear
- repeat 2. for each object you have
After you finish, you will have one zip of images for each object class + one for "no object / background".
Extract the zips and move to the next step.

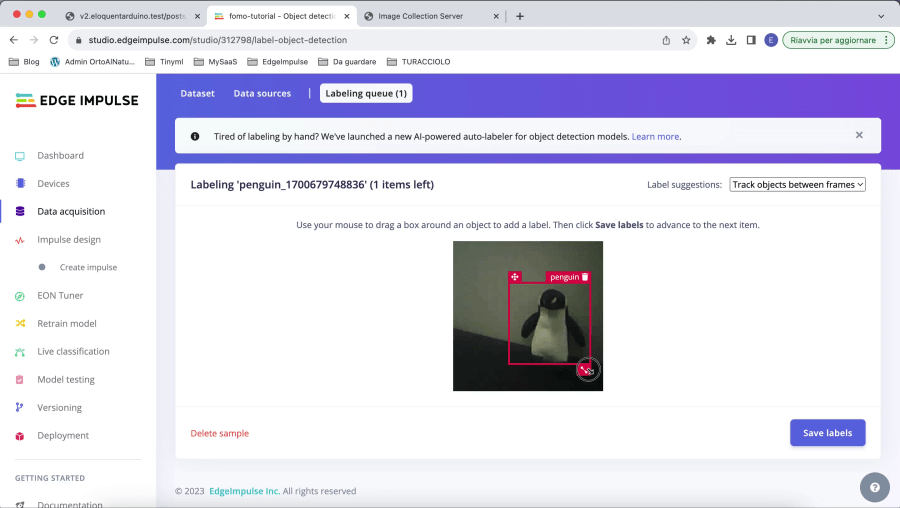
[4/8] Use Edge Impulse to Label the Images
For object detection to work, we need to label the objects we want to recognize.
There are a few tools online, but Edge Impulse has one integrated that works good enough for our project. Register a free account on edgeimpulse.com if you don't have one already.
Create a new project, name it something like esp32-cam-object-detection, then choose Images > Classify multiple objects > Import existing data.
Now follow these EXACT steps to speed up the labelling:
- click
Select filesand select all the images in the "no object / background" folder; checkAutomatically split between training and testing; then hitBegin upload - close the modal and click
Labelling queuein the bar on top - always click
Save labelswithout doing anything! (since there's no object in these images, we'll use them for background modelling) - once done for all the images, go back to
Upload datain the bar on top - click
Select filesand select all the images in the first object folder. Only upload the images of a single folder at a time!! - Check
Automatically split between training and testing; then hitBegin upload - go to
Labelling queuein the top bar and draw the box around the object you want to recognize. On the right, make sureLabel suggestions: Track objects between framesis selected - label all the images. Make sure to fix the bounding box to fit the object while leaving a few pixels of padding
- repeat 4-7 for each object
If you upload all the images at once, the labelling queue will mix the different objects and you will lose a lot more time to draw the bounding box.
Be smart!
At this point, you will have all the data you need to train the model.
[5/8] Use Edge Impulse to Train the Model
If you've ever used Edge Impulse, you know this part is going to be pretty easy.
- Navigate to
Impulse designon the left menu - enter 48 as both
image widthandimage height - select
Squashas resize mode - Add the
Image processingblock - Add the
Object detectionlearning block - save the impulse
48 is a value that I found working pretty well with non-S3 cameras: it generates a model small enough to fit in memory yet produces usable results. If you have an S3 board, you can change this value to 60 or even 96.

- navigate to
Impulse design > Imageon the left - select
Grayscaleas color depth - click on
Save parameters - click on
Generate features
It should take less than a minute to complete, depending on the number of images.
If you only have a single class of object (as I do in the image), the plot on the right will have little meaning, just ignore it.

What about RGB images?
Edge Impulse also works with RGB images. The problem is that RGB models are slower than grayscale ones, so I suggest you start with the grayscale version, test it on your board, and "upgrade" to the RGB one only if you find it is not performing fine.
- navigate to
Impulse design > Object detection - set the number of training cycles to 35
- set learning rate to 0.005
- click on
Choose a different modelright below the FOMO block - select
FOMO (Faster Objects, More Objects) MobileNetV2 0.1
This is the smallest model we can train and the only one that fits fine on non-ESP32S3 camera boards.
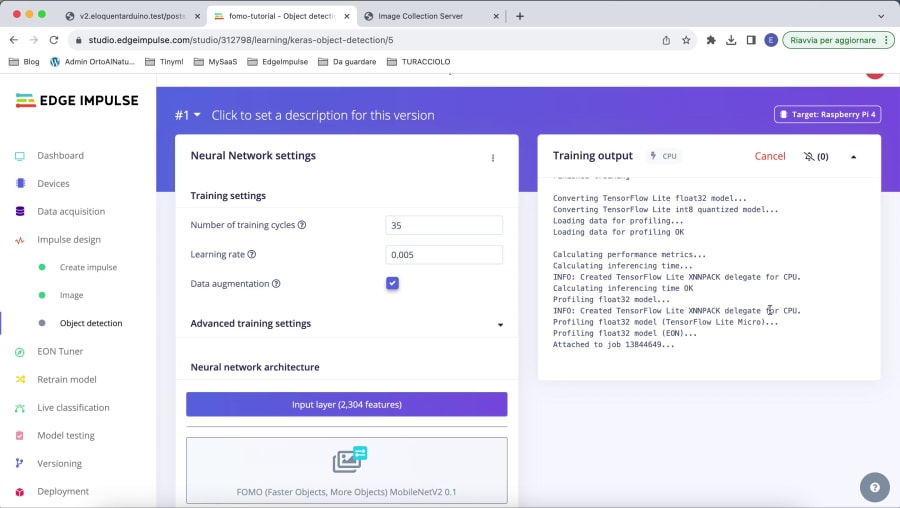
Hit Start training and wait until it completes. It can take 4-5 minutes depending on the number of images.

To get accurate estimates of inferencing time and memory usage as the above image shows, be sure to select "Espressif ESP-EYE" as target board in the top-right corner of the Edge Impulse page.
If you're satisfied with the results, move to the next step. If you're not, you have to:
- collect more / better images. Good input data and labelling is a critical step of Machine Learning
- increase the number of training cycles (don't go over 50, it's almost useless)
- decrease the learning rate to 0.001. It may help, or not
Now that all looks good, it's time to export the model.
[6/8] Export the Model to an Arduino Library
This is the shortest step.
- Navigate to
Deploymenton the left menu - select
Arduino Library - scroll down and hit
Build.
A zip containing the model library will download.

[7/8] Sketch deployment
Before I went on this personally, as a beginner with Edge Impulse, I couldn't find any good tutorial on how to deploy an object detection model to the Esp32-camera on the entire web!
That's why I'm keeping this tutorial free instead of making it a premium chapter of my paid eBook.
- open the Arduino IDE and create a new sketch
- select
Esp32 Dev ModuleorESP32S3 Dev Module(depending on your board) as model - enable external PSRAM (for S3 boards, select
OPI PSRAM) - navigate to
Sketch > Include library > Add .zip libraryand select the zip downloaded from Edge Impulse. - copy the sketch below inside your project
Don't forget to change the name of the Edge Impulse library if your filename is different!
Filename: EdgeImpulse_FOMO_NO_PSRAM.ino
/**
 * Run Edge Impulse FOMO model.
 * It works on both PSRAM and non-PSRAM boards.
 *
 * The difference from the PSRAM version
 * is that this sketch only runs on 96x96 frames,
 * while PSRAM version runs on higher resolutions too.
 *
 * The PSRAM version can be found in my
 * "ESP32S3 Camera Mastery" course
 * at https://dub.sh/ufsDj93
 *
 * BE SURE TO SET "TOOLS > CORE DEBUG LEVEL = INFO"
 * to turn on debug messages
 */
#include <your-fomo-project_inferencing.h>
#include <eloquent_esp32cam.h>
#include <eloquent_esp32cam/edgeimpulse/fomo.h>

using eloq::camera;
using eloq::ei::fomo;


/**
 *
 */
void setup() {
    delay(3000);
    Serial.begin(115200);
    Serial.println("__EDGE IMPULSE FOMO (NO-PSRAM)__");

    // camera settings
    // replace with your own model!
    camera.pinout.aithinker();
    camera.brownout.disable();
    // NON-PSRAM FOMO only works on 96x96 (yolo) RGB565 images
    camera.resolution.yolo();
    camera.pixformat.rgb565();

    // init camera
    while (!camera.begin().isOk())
        Serial.println(camera.exception.toString());

    Serial.println("Camera OK");
    Serial.println("Put object in front of camera");
}


void loop() {
    // capture picture
    if (!camera.capture().isOk()) {
        Serial.println(camera.exception.toString());
        return;
    }

    // run FOMO
    if (!fomo.run().isOk()) {
      Serial.println(fomo.exception.toString());
      return;
    }

    // how many objects were found?
    Serial.printf(
      "Found %d object(s) in %dms\n",
      fomo.count(),
      fomo.benchmark.millis()
    );

    // if no object is detected, return
    if (!fomo.foundAnyObject())
      return;

    // if you expect to find a single object, use fomo.first
    Serial.printf(
      "Found %s at (x = %d, y = %d) (size %d x %d). "
      "Proba is %.2f\n",
      fomo.first.label,
      fomo.first.x,
      fomo.first.y,
      fomo.first.width,
      fomo.first.height,
      fomo.first.proba
    );

    // if you expect to find many objects, use fomo.forEach
    if (fomo.count() > 1) {
      fomo.forEach([](int i, bbox_t bbox) {
        Serial.printf(
          "#%d) Found %s at (x = %d, y = %d) (size %d x %d). "
          "Proba is %.2f\n",
          i + 1,
          bbox.label,
          bbox.x,
          bbox.y,
          bbox.width,
          bbox.height,
          bbox.proba
        );
      });
    }
}[8/8] Run
This is going to be the most rewarding step of all this tutorial.
Save the sketch, hit upload, open the Serial Monitor and watch the predictions text magically appearing while you put your objects in front of the camera.
Object Detection at higher resolutions
So far, we've been collecting images at YOLO resolution (96x96) to save RAM and perform little-to-no rescaling on the source image. This allowed us to fit the model on the little space available on non-S3 boards.
But what if you own a S3 board with plenty of RAM?
Why should you not leverage that much more memory?
In fact, you can well capture images at the resolution you prefer (up to the RAM limits, of course) and still have space to run FOMO model.
The following sketch is very similar to the previous one, but with a huge difference: instead of setting yolo resolution with RGB565 encoding, it is using JPEG encoding at VGA resolution (640 x 480).
This source code is only available to paying users.
What else you will get:
- Advanced motion detection
- Face detection
- Advanced Edge Impulse FOMO
- Edge Impulse FOMO Pan-Tilt
- Self-driving car
You may ask what difference it makes.
Let's say you're implementing a wildlife camera to shoot at bears in the forest. You may want to store those frames on a SD card when you recognize such an animal.
With the non-PSRAM version, you won't be able to do so, since the image is captured at 96x96 resolution and it would be too small to be of any use. Now, instead, you have access to the full resolution image.
Event-Driven object detection
In the Quickstart sketch, we saw how easy and linear it is to run object detection; it only requires a few lines of code. Nevertheless, the loop() function is pretty lengthy now because it has to continuously check if one or more objects are present in the frame.
In this section, I'm going to show you how to move all the logic into the setup() function instead. We will exploit a style of programming called event driven (or reactive). Event driven programming consists in registering a listener function that will run when an event of interest happens. In our case, the event of interest is one or more object being detected.
Why is this useful?
To begin, because it allows for leaner loop() code, where you can focus on running other tasks that need to occur in parallel to face detection. And then, event listeners often help to isolate specific functionalities (object detection handling) into their own routines, visually de-cluttering other tasks' code.
Here's the updated sketch.
This source code is only available to paying users.
What else you will get:
- Advanced motion detection
- Face detection
- Advanced Edge Impulse FOMO
- Edge Impulse FOMO Pan-Tilt
- Self-driving car
The configuration part is exactly the same as before. The new entry is the daemon object which does 2 things:
- accepts event listeners to be run on events of interest
- runs the face detection code in background
There are 3 types of listeners you can register:
whenYouDontSeeAnything: this runs when no object is detectedwhenYouSeeAny: this runs whenever an object (any object) is detectedwhenYouSee(label): this runs only when an object with the given label is detected
Object detection to MQTT
In your specific project, detecting an object may only be the first step in a larger system.
Maybe you want to log how many objects were detected in a database, or get a notification on your phone, or an email... whatever. There are many ways to accomplish this goal. One of the most popular in the maker community is using the MQTT protocol as a mean of systems communication.
The EloquentEsp32Cam has a first party integration for MQTT.
In the following sketch, you will have to replace the test.mosquitto.org broker with your own and (if required) add proper authentication. Beside that, the sketch will work out of the box.
Software requirements
EloquentEsp32Cam >= 2.2PubSubClient >= 2.8
This source code is only available to paying users.
What else you will get:
- Advanced motion detection
- Face detection
- Advanced Edge Impulse FOMO
- Edge Impulse FOMO Pan-Tilt
- Self-driving car
What is the payload that will be uploaded? It is a JSON description of all the objects found in the frame.
[{"label": "penguin", "x": 8, "y": 16, "w": 32, "h": 32, "proba": 0.8}, ...]Object detection streaming
So far, we were only able to debug object detection in the Serial Monitor. It would be much better if we could visually debug it by seeing the realtime streaming video from the camera at the same time.
As far as I know (at least to the date of Dec 2023), this feature does not exists anywhere else on the web. It took a lot of work to make this happen but it was worth is, since the result is stunning.

When the object that you trained your FOMO model on is recognized, you will see a dot on its centroid.
The streaming may be laggish because of poor wifi. Consider that sketch is mainly for debug purposes, not for real time execution.
Here's the code.
This source code is only available to paying users.
What else you will get:
- Advanced motion detection
- Face detection
- Advanced Edge Impulse FOMO
- Edge Impulse FOMO Pan-Tilt
- Self-driving car