Person detection running on our cheap ESP32 cam has become a common task nowadays.
Only a few years ago this would have been simply impossible because of lack of both hardware (Arduino boards used to feature a mediocre 16 kb RAM) and software (neural networks support for embedded systems was simply non-existent).
As of today, lots of things has changed and person detection has even become one the get started projects for TinyML. Nonetheless, many tutorials on the subject are a bit convoluted and pretty hard to follow, let alone modify and integrate into your very own project.
But it doesn't have to be that way.
I'm going to show you how you can add person detection on your very own ESP32 camera project in 5 minutes!
Software requirements
You will need to install 3 libraries:
tlfm_esp32: the TensorFlow runtime for the ESP32EloquentTinyML: a wrapper around TensorFlowEloquentEsp32Cam: to interact with camera easily
You can install them all from the Arduino Library Manager.
Be sure you have the latest version of each!
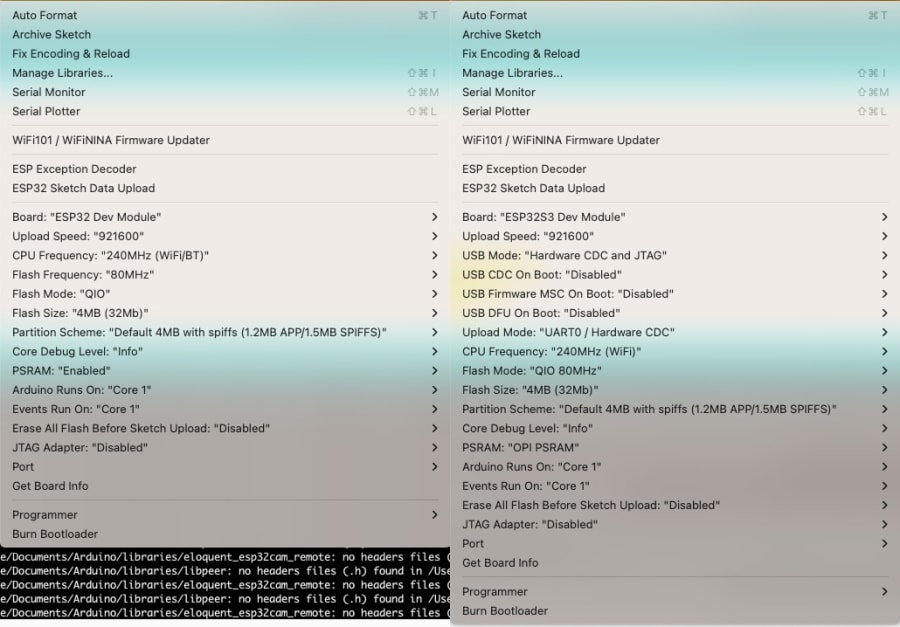
Arduino IDE Tools configuration for ESP32S3
!!! Install ESP32 core version 2.x, version 3.x won't work !!!
| Board | ESP32S3 Dev Module |
| Upload Speed | 921600 |
| USB Mode | Hardware CDC and JTAG |
| USB CDC On Boot | Disabled |
| USB Firmware MSC On Boot | Disabled |
| USB DFU On Boot | Disabled |
| Upload Mode | UART0 / Hardware CDC |
| CPU Frequency | 240MHz (WiFi) |
| Flash Mode | QIO 80MHz |
| Flash Size | 4MB (32Mb) |
| Partition Scheme | Huge APP (3MB No OTA/1MB SPIFFS) |
| Core Debug Level | Info |
| PSRAM | OPI PSRAM |
| Arduino Runs On | Core 1 |
| Events Run On | Core 1 |
| Erase All Flash Before Sketch Upload | Disabled |
| JTAG Adapter | Disabled |
Arduino sketch
This part is easy, you don't have to write much code nor configure many options.
Filename: PersonDetectionExample.ino
/**
 * Run person detection on ESP32 camera
 *  - Requires tflm_esp32 library
 *  - Requires EloquentEsp32Cam library
 *
 * Detections takes about 4-5 seconds per frame
 */
#include <Arduino.h>
#include <tflm_esp32.h>
#include <eloquent_tinyml.h>
#include <eloquent_tinyml/zoo/person_detection.h>
#include <eloquent_esp32cam.h>

using eloq::camera;
using eloq::tinyml::zoo::personDetection;


void setup() {
    delay(3000);
    Serial.begin(115200);
    Serial.println("__PERSON DETECTION__");

    // camera settings
    // replace with your own model!
    camera.pinout.freenove_s3();
    camera.brownout.disable();
    // only works on 96x96 (yolo) grayscale images
    camera.resolution.yolo();
    camera.pixformat.gray();

    // init camera
    while (!camera.begin().isOk())
        Serial.println(camera.exception.toString());

    // init tf model
    while (!personDetection.begin().isOk())
        Serial.println(personDetection.exception.toString());

    Serial.println("Camera OK");
    Serial.println("Point the camera to yourself");
}

void loop() {
    Serial.println("Loop");

    // capture picture
    if (!camera.capture().isOk()) {
        Serial.println(camera.exception.toString());
        return;
    }

    // run person detection
    if (!personDetection.run(camera).isOk()) {
        Serial.println(personDetection.exception.toString());
        return;
    }

    // a person has been detected!
    if (personDetection) {
        Serial.print("Person detected in ");
        Serial.print(personDetection.tf.benchmark.millis());
        Serial.println("ms");
    }
}The sketch can be broken into the following parts.
Configure
// configure camera
camera.pinout.freenove_s3();
camera.brownout.disable();
// only works on 96x96 (yolo) grayscale images
camera.resolution.yolo();
camera.pixformat.gray();

// init camera
while (!camera.begin().isOk())
    Serial.println(camera.exception.toString());

// init tf model
while (!personDetection.begin().isOk())
Serial.println(personDetection.exception.toString());Run
// capture picture
if (!camera.capture().isOk()) {
    Serial.println(camera.exception.toString());
    return;
}

// run person detection
if (!personDetection.run(camera).isOk()) {
    Serial.println(personDetection.exception.toString());
    return;
}Test
// test if a person is detected
if (personDetection) {
    // do whatever you want here...
}Customize
Customizing the sketch is easy. You can add your own logic to be performed when a person is detected inside the if block above.
A few use cases you can implement:
- a smart door bell that activates when it recognizes a person in front of it
- a smart relay that turns the lights on when you're back at home
- count the number of people passing in front of your camera
Feel free to let me know what you implemented with the form below.
If you're stuck, don't hesitate to ask for help.
Appendix. Camera config
To run the above code, set these configurations in your Tools menu (left is for ESP32, right form ESP32S3).